Creating New Entry Points
Entry points are the gateways from your website front end which you maintain to the back end where sales happen.

Table of Contents
Entry points are the purchase links you use to bridge the gap between your front-end website and the Agile back-end where ticket sales occur. Entry point links can be generated for any single item like a donation or groups of items such as a calendar of events. Select your platform of choice and follow the instructions to create as many entry points as you need.
New Entry Points Web Portal
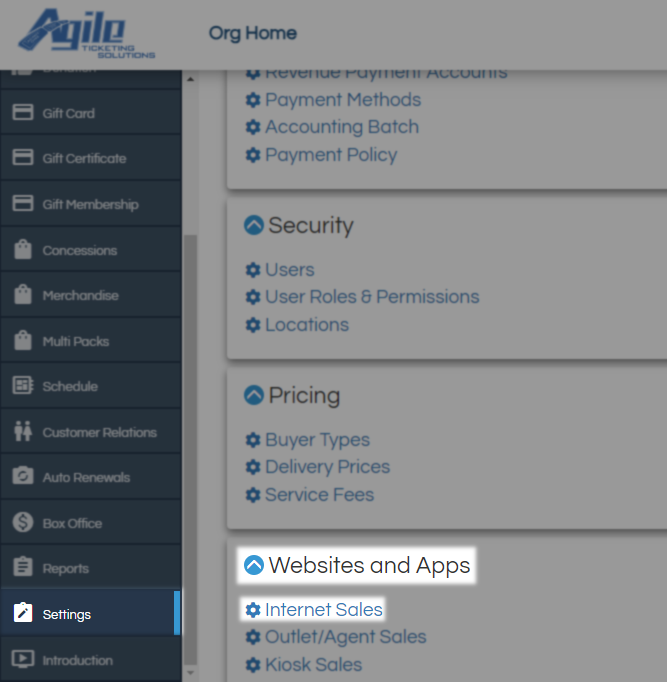
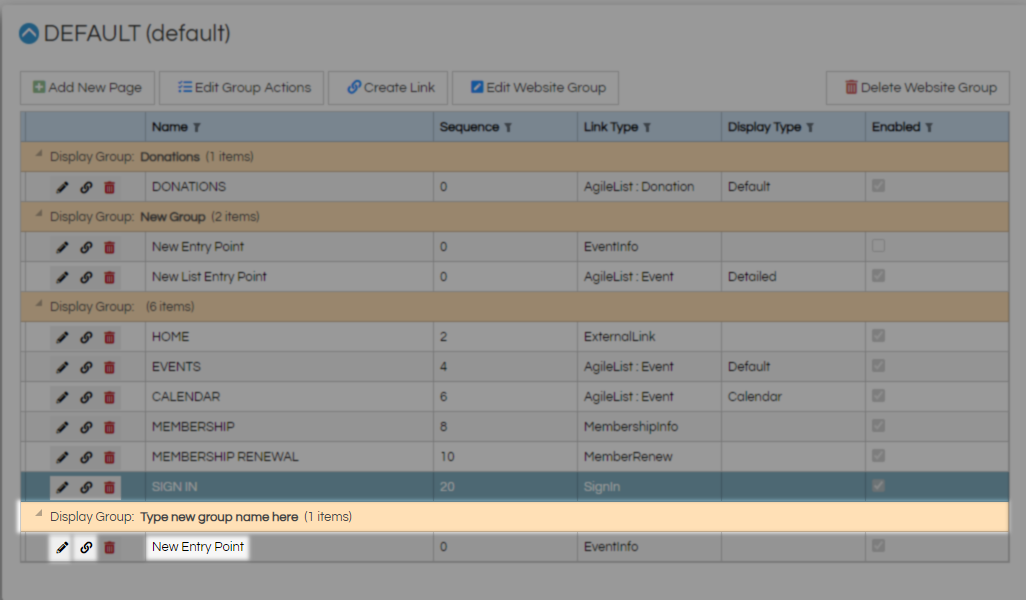
Begin by Logging In to the Web Portal and locating the Settings button on the left menu bar. Next, scroll down to the Websites and Apps section and click on Internet Sales.
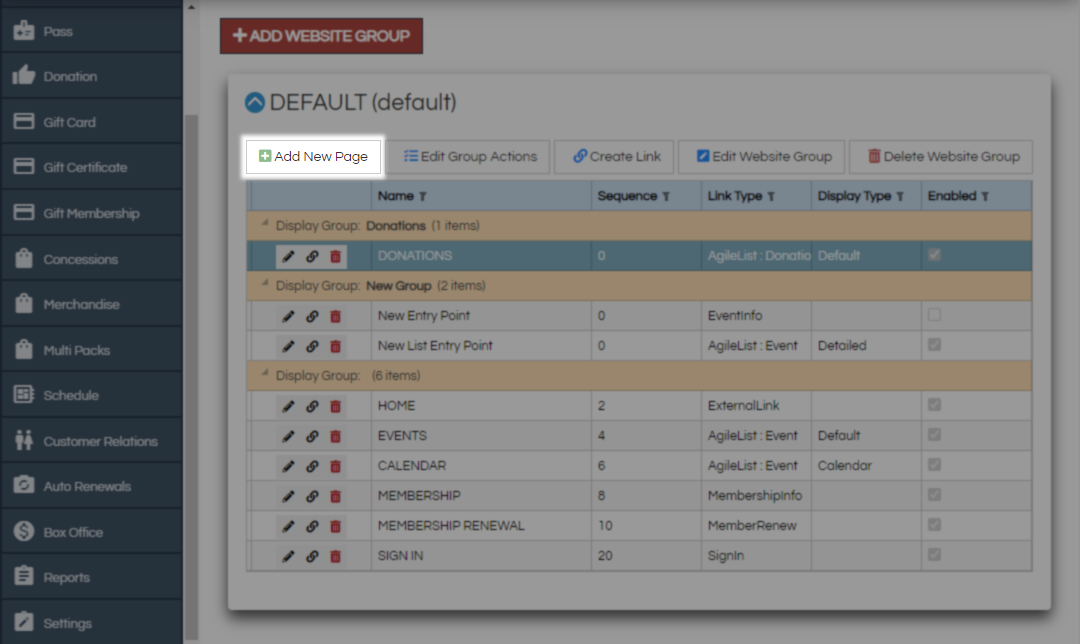
Now on the Entry Point Groups page find your default which will likely carry the name of your organization and will already contain all of your starting entry points. Click Add New Page to create a new entry point.
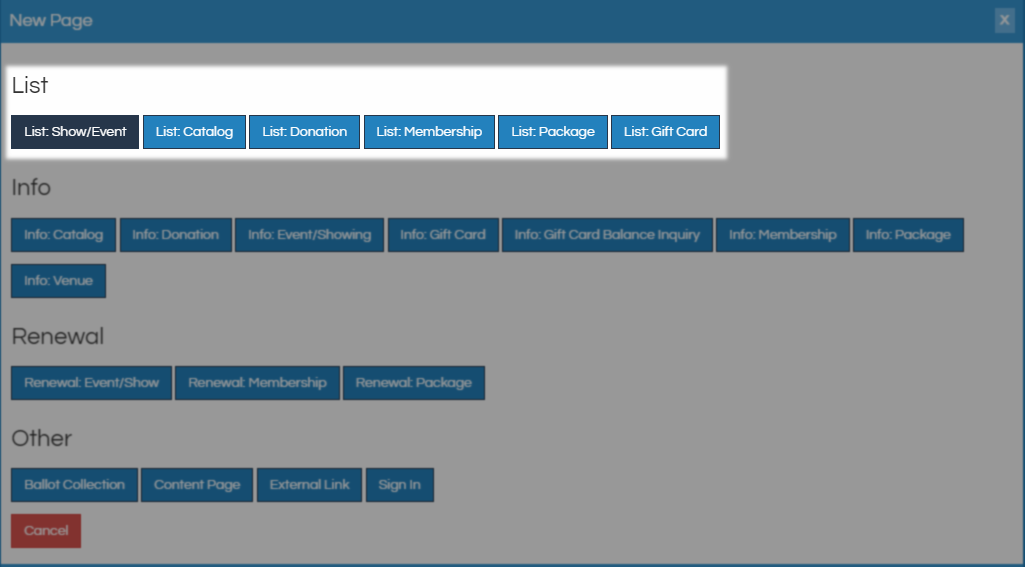
When creating a new entry point it's important to first know what you want to display to your customers. All of the options under the List category can be used to create a page that will display more than one item of that type. The options found under Info, Renewal, and Other will all be pointed at one specific item unless otherwise stated. Below is a list of what each of the subcategories is for.
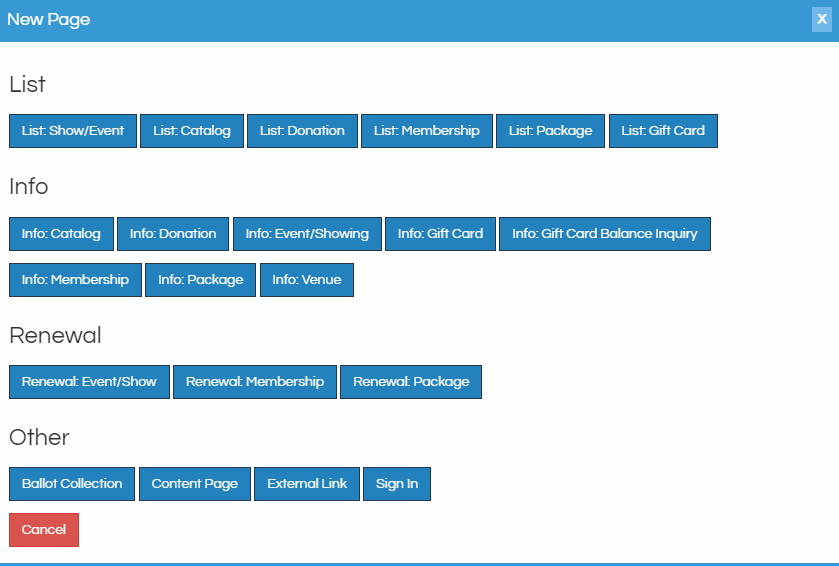
Ballot Collection - Allows patrons to vote on events during the voting period you specify.
Content Page - This creates a blank page where you may add text, images, and HTML directly.
Catalog - This category refers to all catalog items which will include concessions and merchandise sales as well as some ticket packs.
Donation - Displays information specific to your donation programs
Event/Showing - Displays information specific to your events and showings. Picking this under the renewal category will set you up for returning customers to have last years seats.
External Link - Allows a URL you specify to be added to the navigation bar. This feature can be used to add a "Home" option to your menu that directs back to your website.
Gift Card - Displays information about your gift card, gift certificate, or gift membership programs.
Gift Card Balance Inquiry - Allows customers to check the balance of their gift card, gift certificate, or gift membership online.
Membership - Displays information specific to your membership program. Picking this under the Renewal category will show customers your renewal pricing page instead of your new pricing page.
Package - Displays information specific to your packages. Picking this under the renewal category will let customers renew into the seats they had previously.
Sign In - Provides an area for patrons to sign into their online account.
Venue - Allows patrons to see what is playing now or next at a specific venue. This is most useful when used with Visual Venue Digital Signage.
Now that you have an idea which entry point to create select the appropriate category to learn more.
This style of entry point covers single item links for any of the following items.
Donations, Catalog items, Content Page, Events, Event Renewals, External Link Gift Cards, Gift Card Balance, Gift Card Renewals, Memberships, Membership Renewals, Packages, Package Renewals, Shows, Show Renewals, Sign In, and Venue.
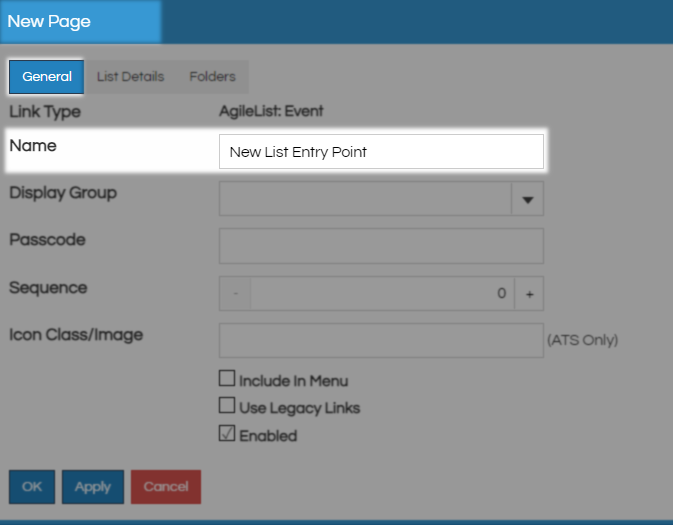
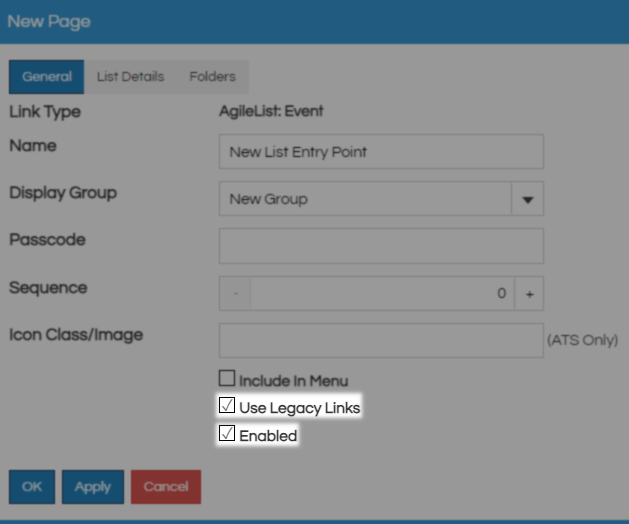
On the New Page window, the first item is Name. Name is a customer-facing field if you include this link in your menu links as described below.
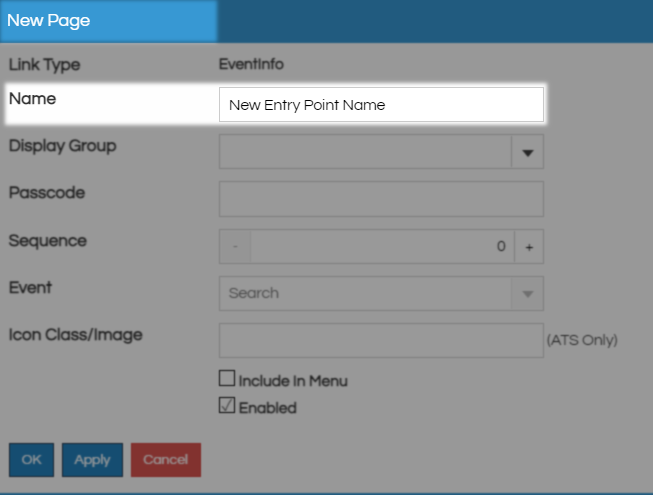
Display Group is used primarily to group entry points together so they are easier to find but is also customer-facing when included in navigation links. For example, If you had links for purchasing memberships, renewing memberships, and gifting memberships, then you could give them all the same Display Group of “Membership”. Use the ellipses to the right of this field to add new options to the menu. You can type in this field to add new options that are not in the drop-down.
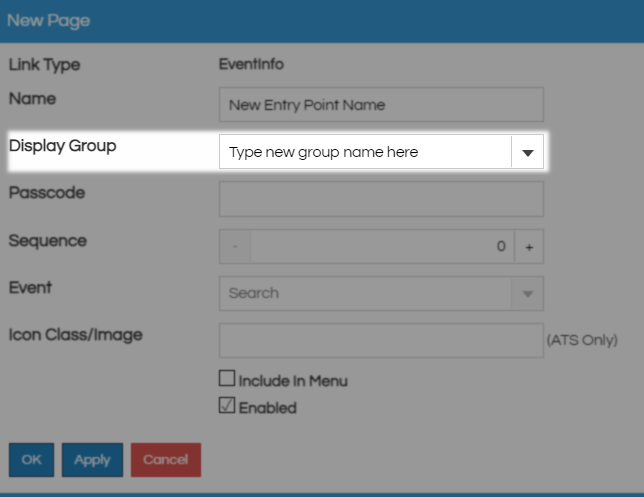
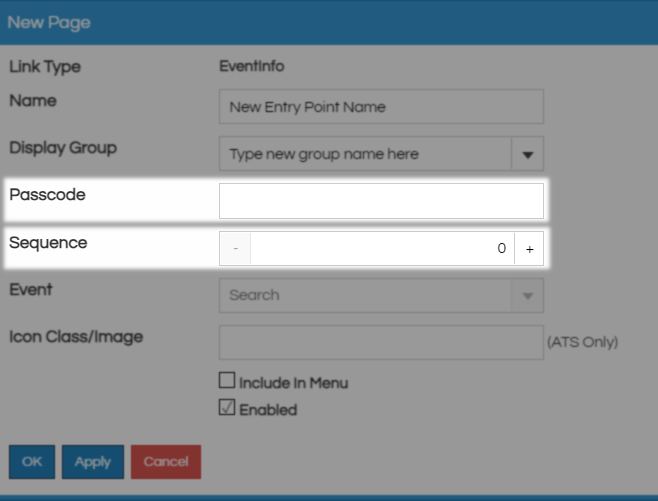
Passcode will protect this entry point from outsiders being able to access it without the password you set. Display Sequence will determine where this link will fall on a list of entry points with lower numbers being further up the list. When left at 0 the system will organize entry points by group and then alphabetically.
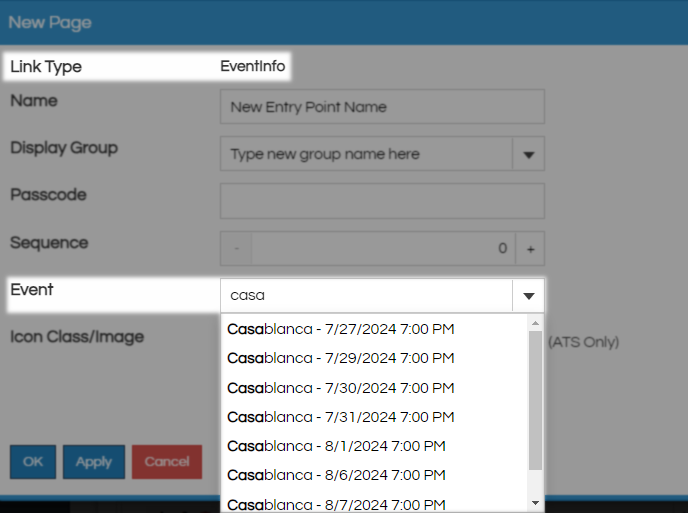
The next field will share a name with the entry point type so in the example it is Event like the Eventinfo link type. Click this field and start typing to search for the show or event this link is for then select it from the drop-down menu.
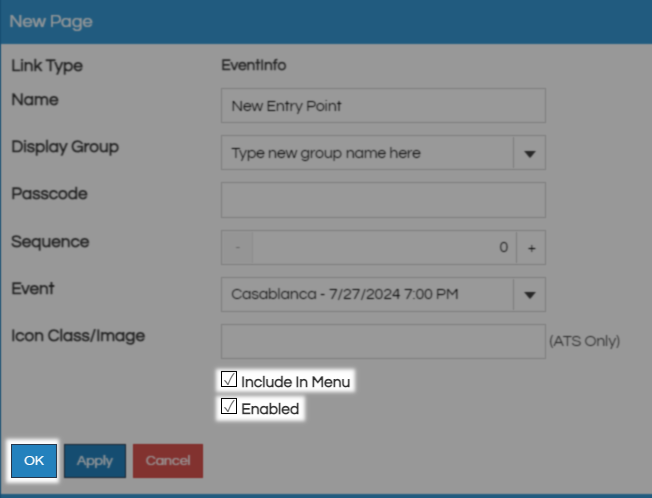
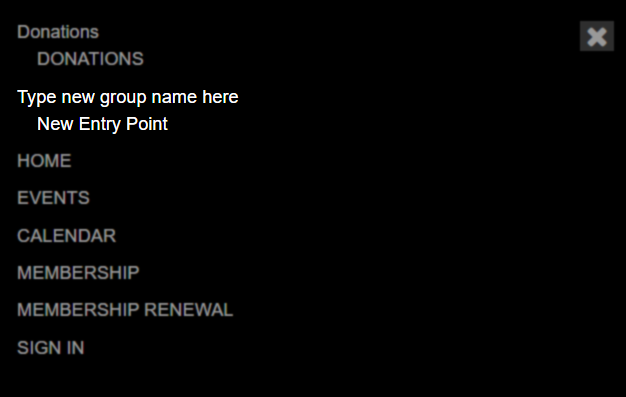
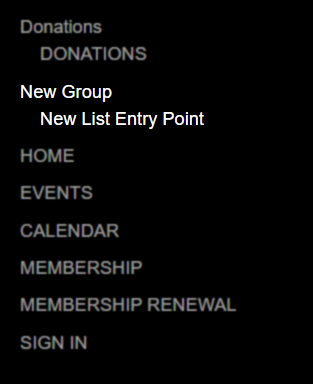
The Include in Menu check box will include this in the hamburger menu on the web side of your Agile back end. Leave Enabled checked so this link is active and click OK to create it.
Now under the heading of any group you created or used you will find your new link. You can either click the Linked Chain icon to copy the new link to your clipboard or use the Edit Pencil to open this link back up and copy the link from the bottom of that page.
If you checked Include in Menu when you load the link you can click the hamburger menu to see how it shows online.
This style of entry point covers anything that can be turned into a list or calendar for the following items.
Catalog items, Donations, Events, Gift Cards, Memberships, and Shows.
After selecting one of the above from the List section of the new entry points page you well begin creation. This example will focus on Show/Event lists but the mechanics will apply to all list types.
On the New Page window the first item on the General tab is Name. Name is a customer-facing field if you include this link in the menu links as discussed below.
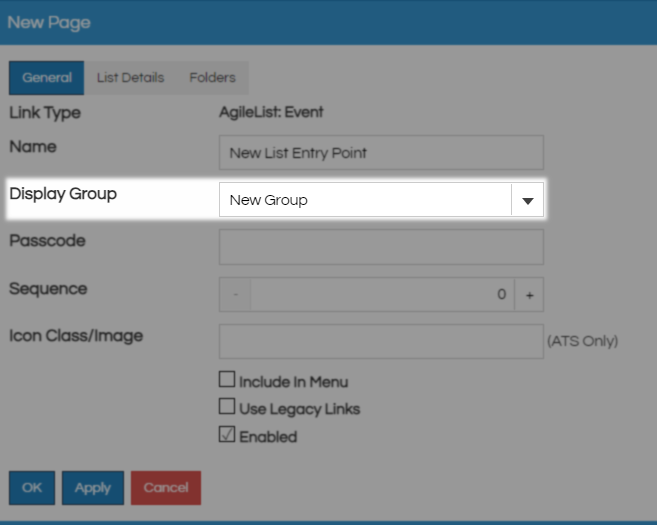
Display Group is used primarily to group entry points together so they are easier to find but is also customer-facing when included in the menu. For example, If you had links for purchasing memberships, renewing memberships, and gifting memberships, then you could give them all the same Display Group of “Membership”. Click and type in this field to add new options or use the drop-down to find options you have already created.
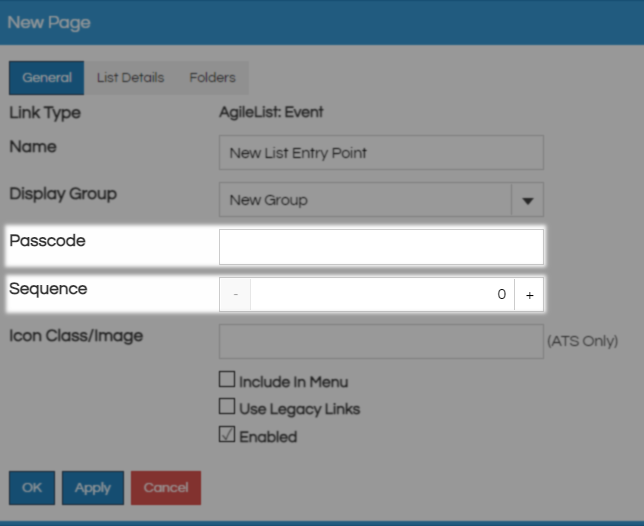
Passcode will protect this entry point from outsiders being able to access it without the password you set. Sequence will determine where this link will fall on a list of entry points with lower numbers being further up the list. When left at 0 the system will organize entry points by group and then alphabetically.
Checking Include in Menu is the setting that puts this link on your web back-end. You should not check this box until you have tested and are happy with this entry point. Once checked this entry point name will appear in your hamburger menu.

Checking Use Legacy Links will remove the more details button from your shows and leave only the buy tickets button. When opened customers are taken to a combination more details and purchase page. Leave Enabled checked or this link will not be active once you are done.
Next swap to the List Details tab where you have Display Type which is where you choose how your list will be presented. Use the link below to see how each looks in use and then continue with building this entry point.
CLICK HERE TO SEE THE DISPLAY TYPES IN ACTION
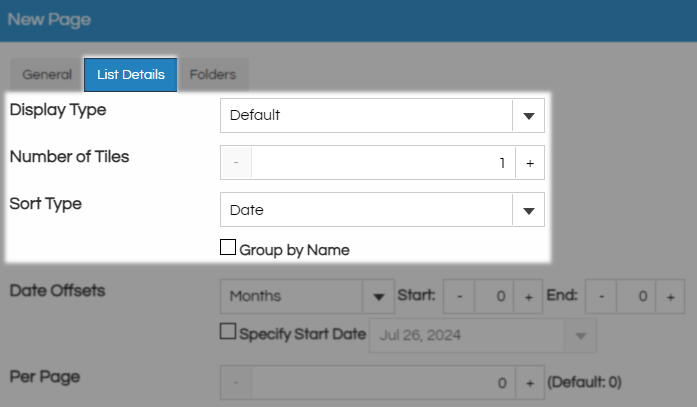
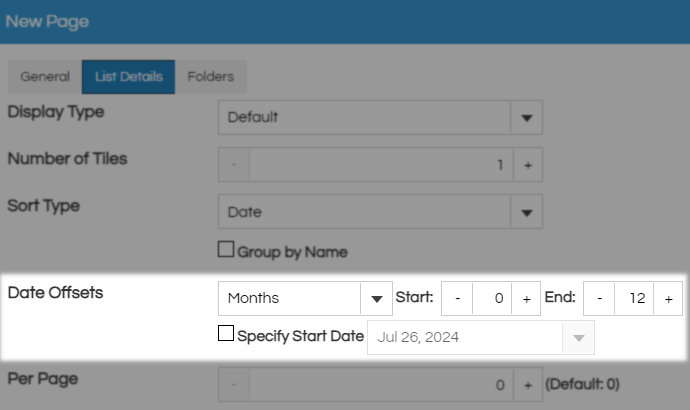
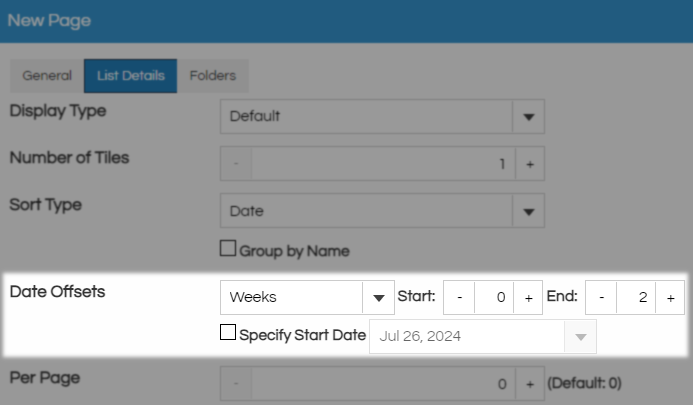
Date Offsets are how you tell the system what time frame to include on your list. Offsets are always asking how far from today would you like to see as a range and you can have this one work on days, weeks, or months using the drop-down menu. It is possible to set a past date here using a negative number. Here are a couple of common examples.
Calendars commonly show a year from today so that would look like this with a start of 0 for today and an end of 12.
Daily admissions may not want to offer a year's worth of dates but still want to build large blocks of events at a time. This one starts at 0 for today and ends 2 weeks later so only the next 14 days will be displayed on this list no matter how far in advance you build.
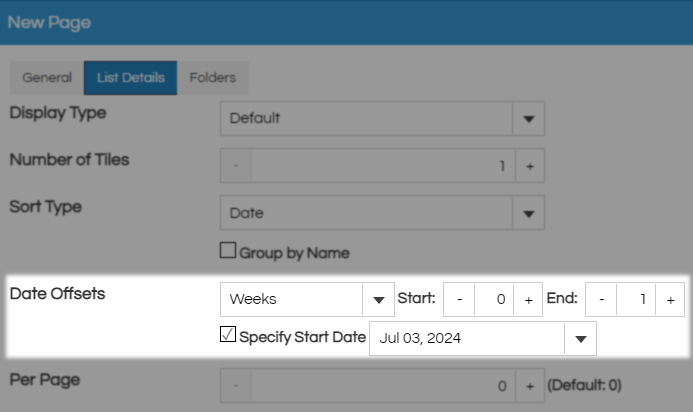
Instead of using the Start offset to determine what day your list will begin displaying you can check the Specific Start Date check box. doing this will let you pick a specific date to start displaying and then the end offset is still when the list will stop. This one will only last 1 week and always shows the same seven days since the start date is fixed and not an offset.
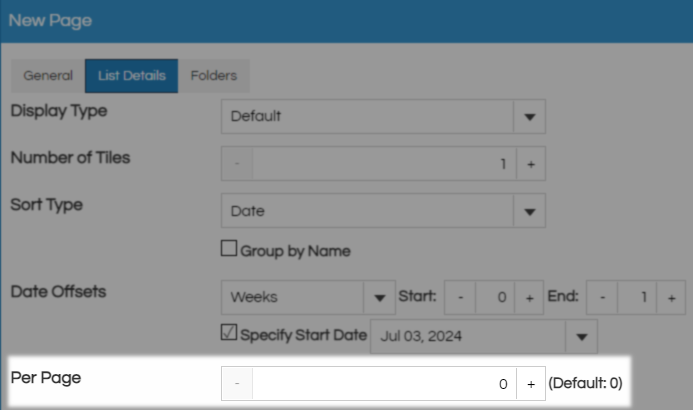
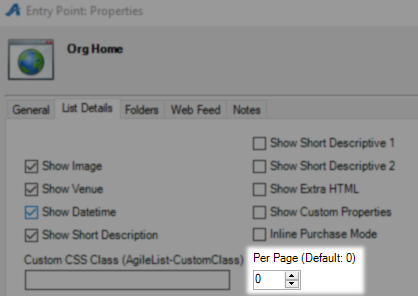
The Per Page field works only with the Category List display type and when in that mode it is advised to set this at a high number to ensure your pages load full of your programming. A value of 100 would make a great starting point for testing out this setting.
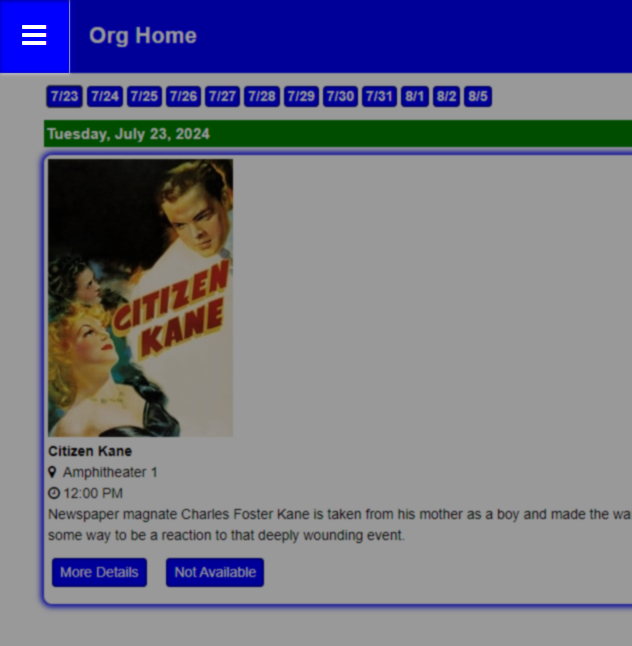
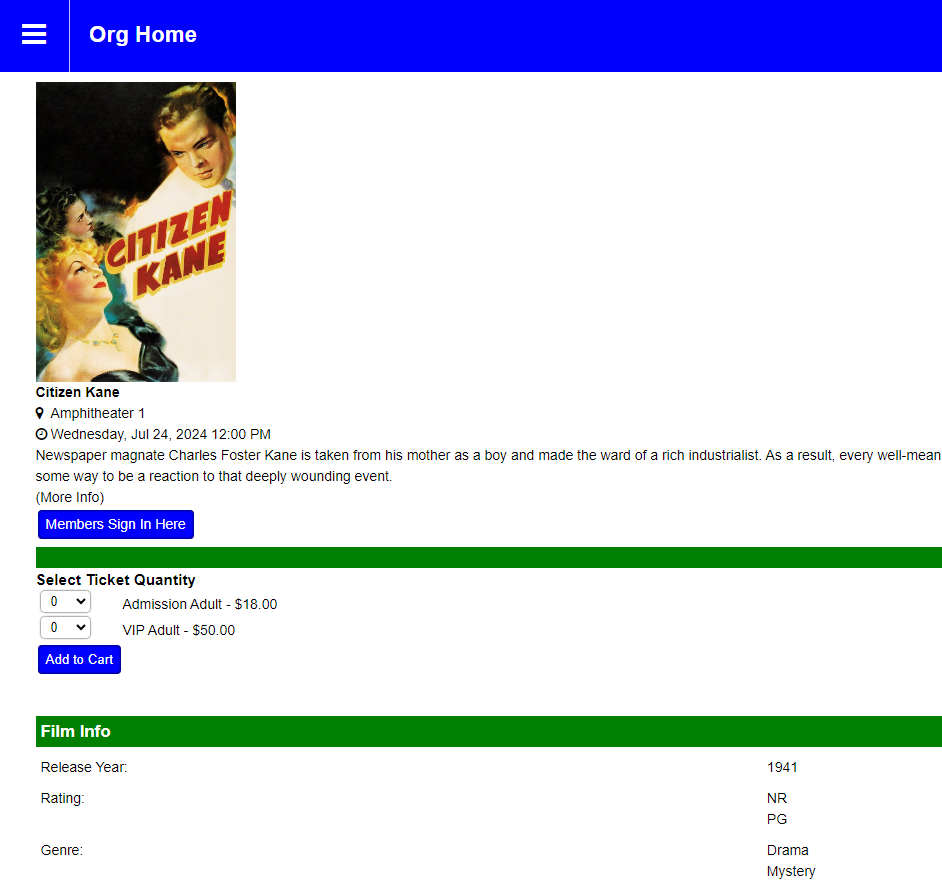
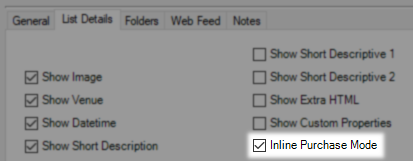
All of the boxes under Modifiers such as Show Image will display information pulled from the event or item info fields of the same name. Not all fields are available on all entry point types.
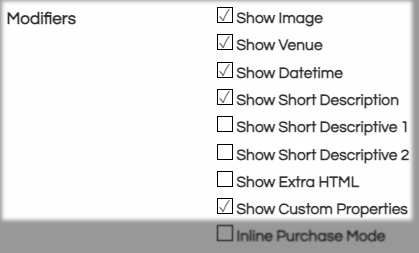
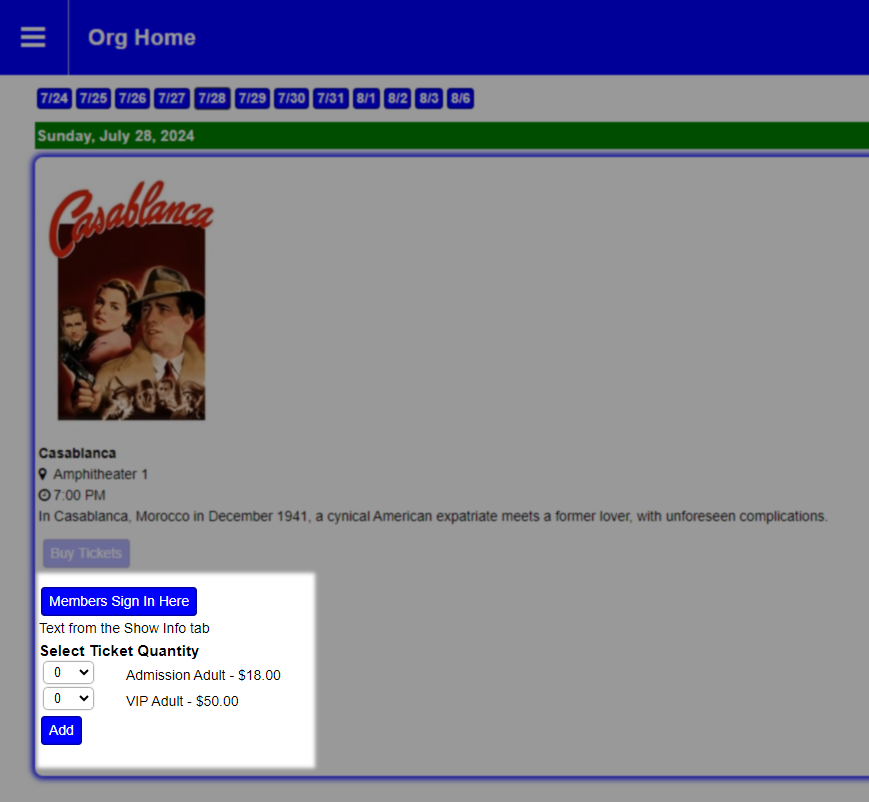
Inline Purchase Mode keeps the customer on the info page when they click to buy tickets and instead loads those tickets on the page they are on.

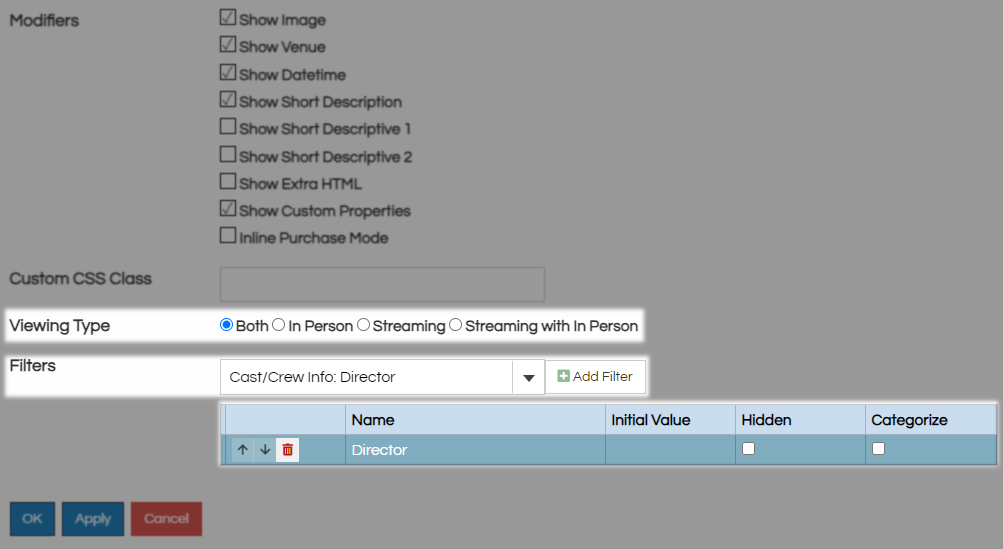
Viewing Type is a way to have only in-person or streaming content showing on this list, the default which will display all of your items is Both. The Filters section is used to create filters for your customers. Using the drop-down menu select the item you would like to filter by and click Add Filter to make it an active filter. In the active filters area, you can click Hidden to make this a background filter customers don't even see and use the Categorize check box with the Category display type. Clicking in the Initial Value field will allow you to set the default for this filter.
The Folders tab is how you designate which folders the system will pull items from. You must select something on this tab or the list will load blank but can designate all folders to include every item regardless of folder including folders you may build in the future. Move your selection from Available to Selected using the arrows between the two fields.

Click OK to save and create this entry point then return to the general tab to get your link. The Blue Pages will copy this link to your clipboard, the Black Boxes will generate a QR code directly to this page, and the Address Field will display the full address for this entry point. For RSS and XML feeds, use the one labeled feed.

This content will be shown (depending on) when button above is clicked
New Entry Points ATS App
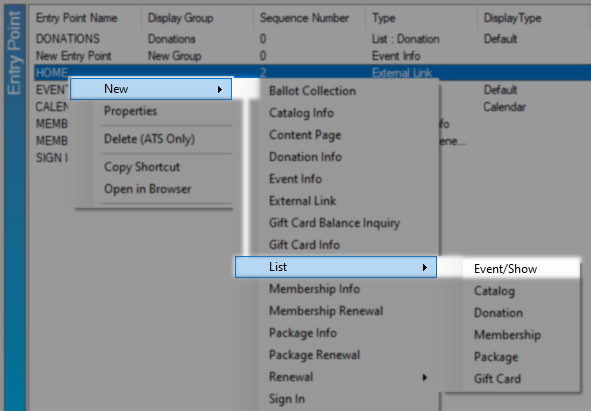
Begin by Logging In to Agile Ticketing Solutions (ATS) administration and find the manila Web folder. Open the Entry Points and in Entry Point Group find your default which will likely carry the name of your organization and will already contain all of your starting entry points.
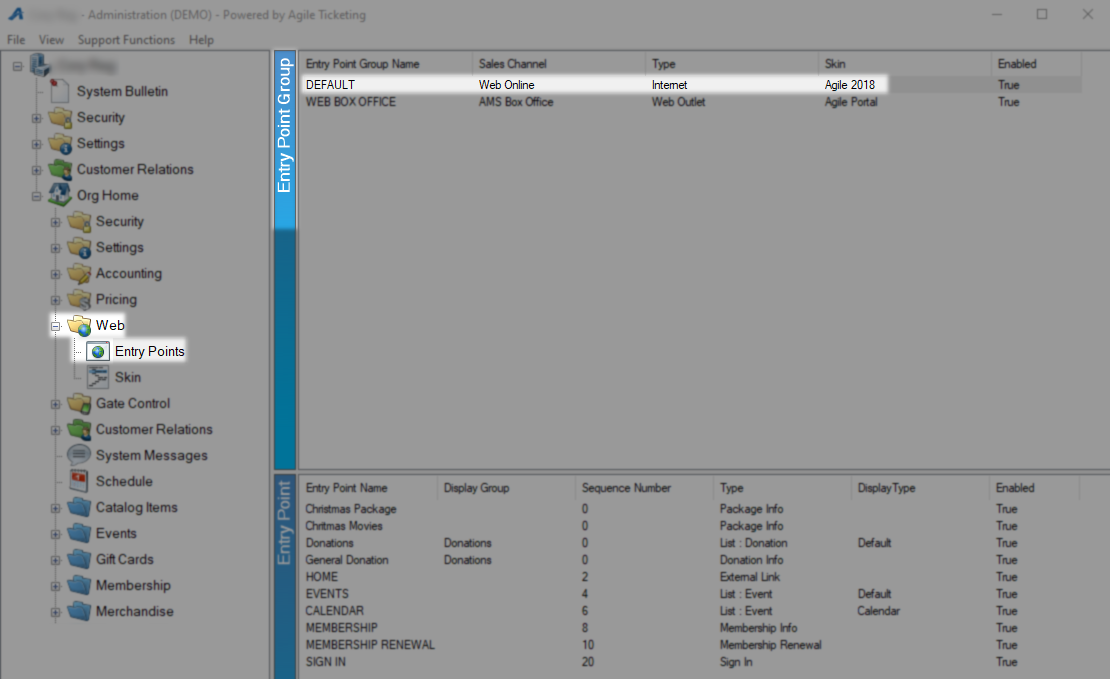
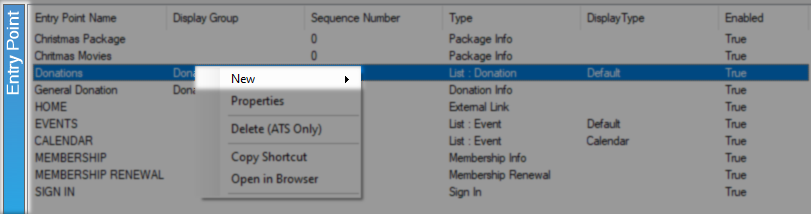
With the group selected all of your entry points will load below in the Entry Point area. Right-click in this area and select New to create a new entry point.
When creating a new entry point it's important to first know what you want to display to your customers as this decision will change the options you have access to. The list below will give you a brief overview of the entry point types.
Ballot Collection - Allows patrons to vote on events during the voting period you specify.
Catalog Info - Displays information specific to a single catalog item.
Content Page - This creates a blank page where you may add text, images, and HTML directly.
Donation Info - Displays information specific to a single donation.
Event Info - Displays information specific to a single event/showing.
External Link - Allows a URL you specify to be added to the navigation bar. This feature can be used to add a "Home" option to your menu that directs back to your website.
Gift Card Balance Inquiry - Allows customers to check the balance of their gift card, gift certificate, or gift membership online.
Gift Card Info - Displays information specific to a single gift card, gift certificate, or gift membership program.
List - Displays information for multiple Donations, Events, Memberships, Catalog Items, Packages, or Gift Cards. This can be targeted at one or multiple folders allowing events from several series to share a calendar or other style of list.
Membership Info - Displays information specific to a single membership program
Membership Renewal - Allows members to renew their memberships online.
Package Info - Displays information specific to a single package.
Package Renewal - Allows package holders to renew their package online.
Sign In - Provides an area for patrons to sign into their online account.
Venue Info - Allows patrons to see what is playing now or next at a specific venue. This is most useful when used with Visual Venue Digital Signage.
Now that you have an idea which entry point to create select the appropriate category to learn more.
This style of entry point covers single-item links for any of the following items.
Donations, Catalog items, Content Page, Events, Event Renewals, External Link Gift Cards, Gift Card Balance, Gift Card Renewals, Memberships, Membership Renewals, Packages, Package Renewals, Shows, Show Renewals, Sign In, and Venue.
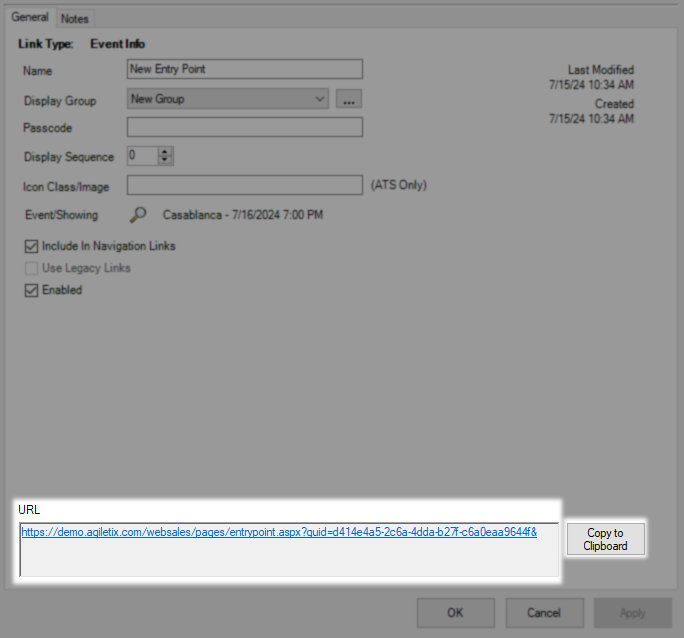
On the Entry Point: New window the first item on the General tab is Name. Name is a customer-facing field if you include this link in the navigation links as discussed below.
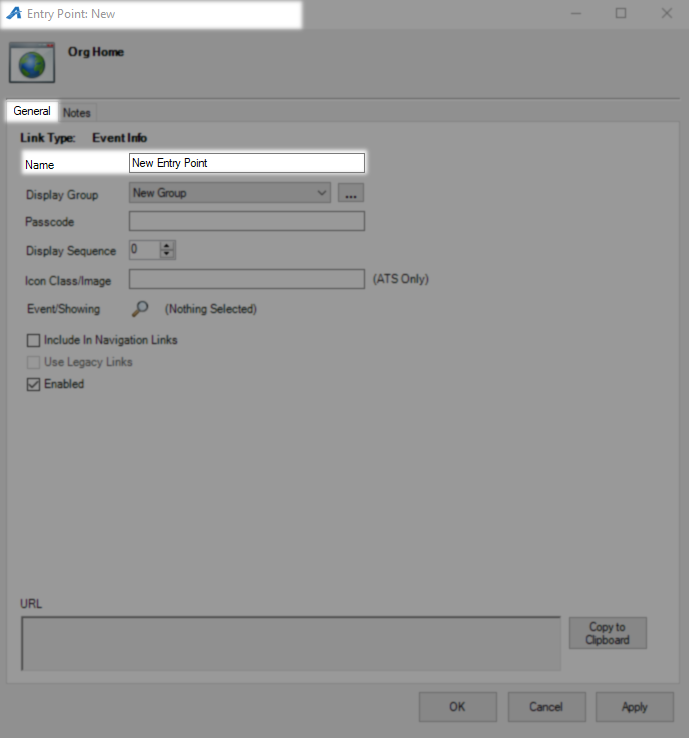
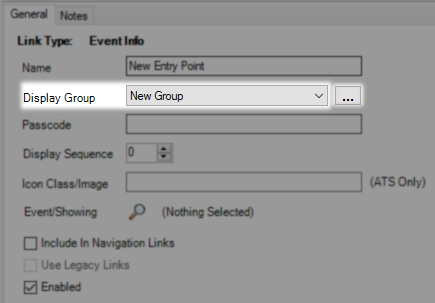
Display Group is used primarily to group entry points together so they are easier to find but is also customer-facing when included in navigation links. For example, If you had links for purchasing memberships, renewing memberships, and gifting memberships, then you could give them all the same Display Group of “Membership”. Use the ellipses to the right of this field to add new options to the menu.
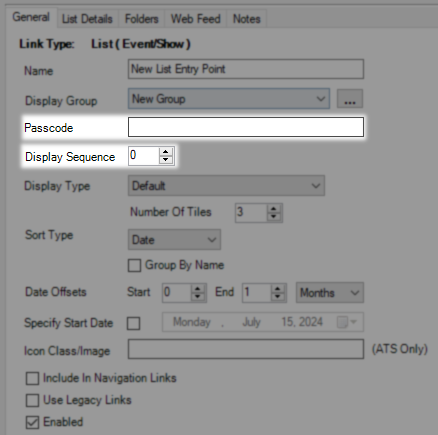
Passcode will protect this entry point from outsiders being able to access it without the password you set. Display Sequence will determine where this link will fall on a list of entry points with lower numbers being further up the list. When left at 0 the system will organize entry points by group and then alphabetically.
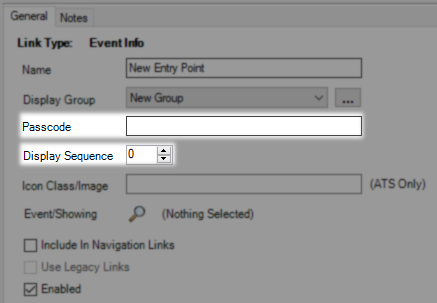
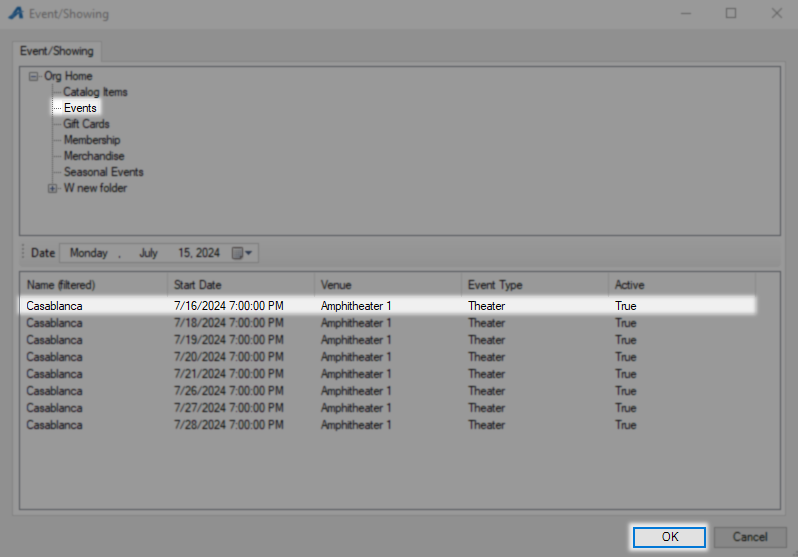
The next field will share a name with the entry point type so in the example it is Event/Showing like the Event entry point type. Click the Magnifying Glass to search for the event this link is for.
In the top area select the folder this item is in and then below select the exact item this link is for and click OK.
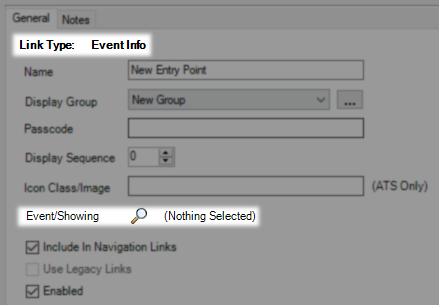
The Include in Navigation Links check box will include this in the hamburger menu on the web side of your Agile back end. Leave Enabled checked so this link is active and click Apply to create it.
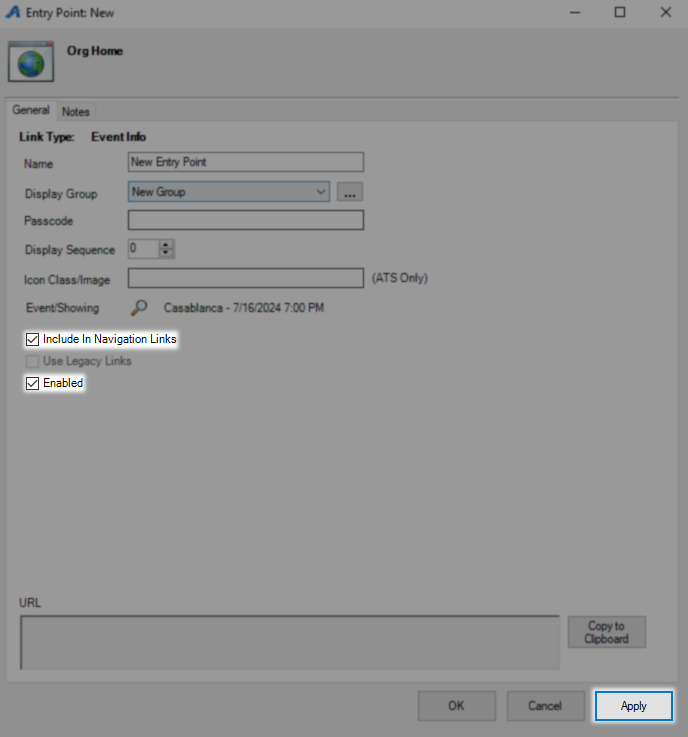
The link to your entry point will load in the URL area. You can now click it to load and test or click Copy to Clipboard to paste it elsewhere.
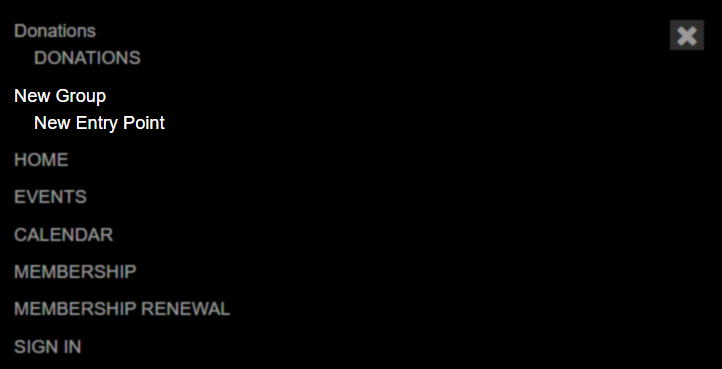
If you checked Include in Navigation when you load the link you can click the hamburger menu to see how it shows online.
This style of entry point covers anything that can be turned into a list or calendar for the following items.
Catalog items, Donations, Events, Gift Cards, Memberships, and Shows
After selecting New in the Entry Point area find List and then select the type of list you are creating, this example will focus on Event/Show lists but the mechanics will apply to all list types.
On the Entry Point: New window the first item on the General tab is Name. Name is a customer-facing field if you include this link in the navigation links as discussed below.
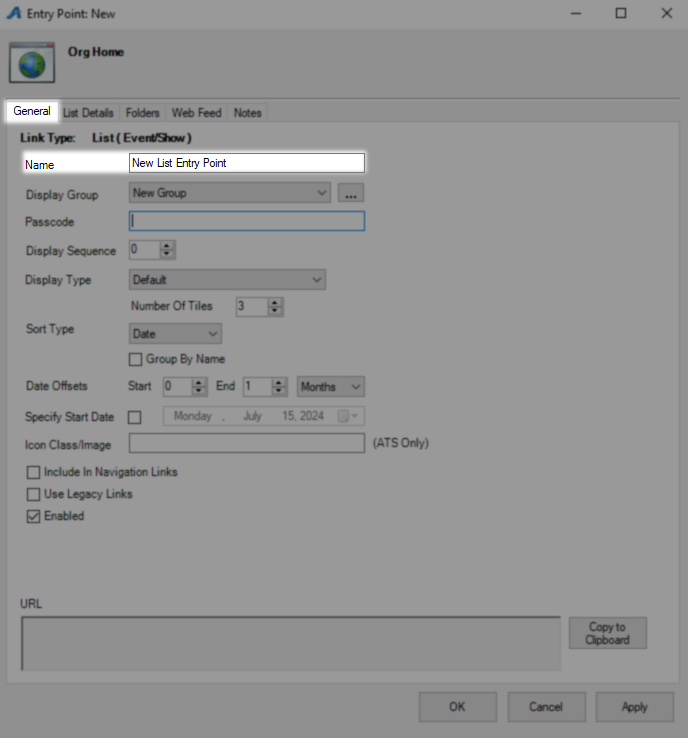
Display Group is used primarily to group entry points together so they are easier to find but is also customer-facing when included in navigation links. For example, If you had links for purchasing memberships, renewing memberships, and gifting memberships, then you could give them all the same Display Group of “Membership”. Use the ellipses to the right of this field to add new options to the menu.
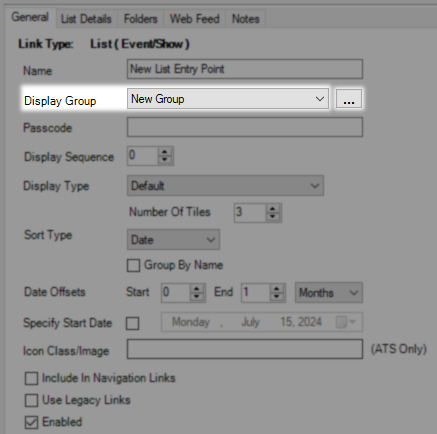
Passcode will protect this entry point from outsiders being able to access it without the password you set. Display Sequence will determine where this link will fall on a list of entry points with lower numbers being further up the list. When left at 0 the system will organize entry points by group and then alphabetically.
Display Type is where you choose how your list will be presented, use the link below to see how each looks in use and then continue with building this entry point.
CLICK HERE TO SEE THE DISPLAY TYPES IN ACTION
Date Offsets are how you tell the system what time frame to include on your list. Offsets are always asking how far from today would you like to see as a range and you can have this one work on days, weeks, or months using the drop-down menu. When reaching into the past for your date range you can use a negative number. Here are a couple of common examples.
Calendars commonly show a year from today so that would look like this with a start of 0 for today and an end of 12.

Daily admissions may not want to offer a year's worth of dates but still want to build large blocks of events at a time. This one starts at 0 for today and ends 2 weeks later so only the next 14 days will be displayed on this list no matter how far in advance you build.

Instead of using the Start offset to determine what day your list will begin displaying you can check the Specific Start Date check box. doing this will let you pick a specific date to start displaying and then the end offset is still when the list will stop. This one will only last 1 week and always shows the same seven days since the start date is fixed and not an offset.

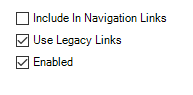
Include In Navigation Links is the setting that puts this link on your web back-end. You should not check this box until you have tested and are happy with this entry point. Once checked this entry point name will appear in your hamburger menu.
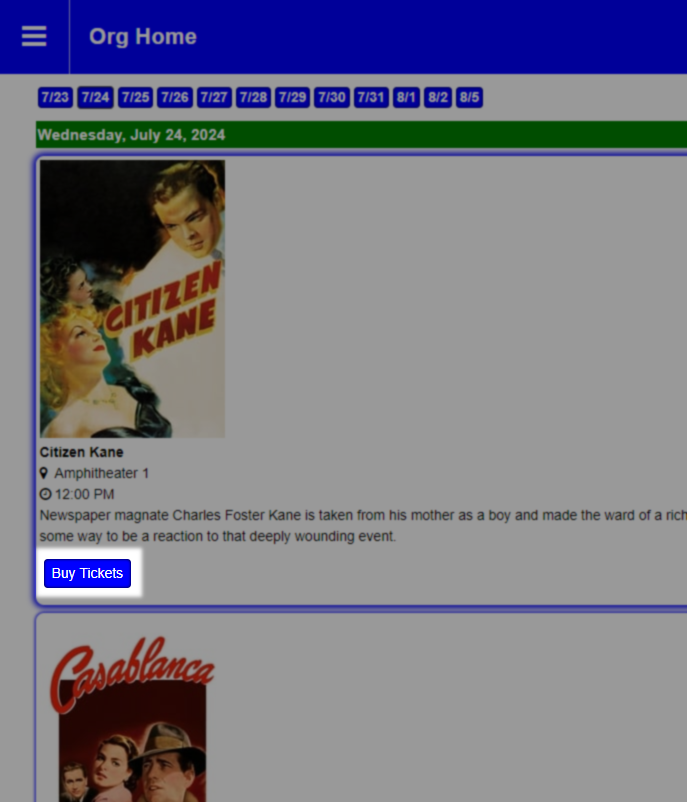
Checking Use Legacy Links will remove the more details button from your shows and leave only the buy tickets button. When opened customers are taken to a combination more details and purchase page. Leave Enabled checked or this link will not be active when you are done with it.
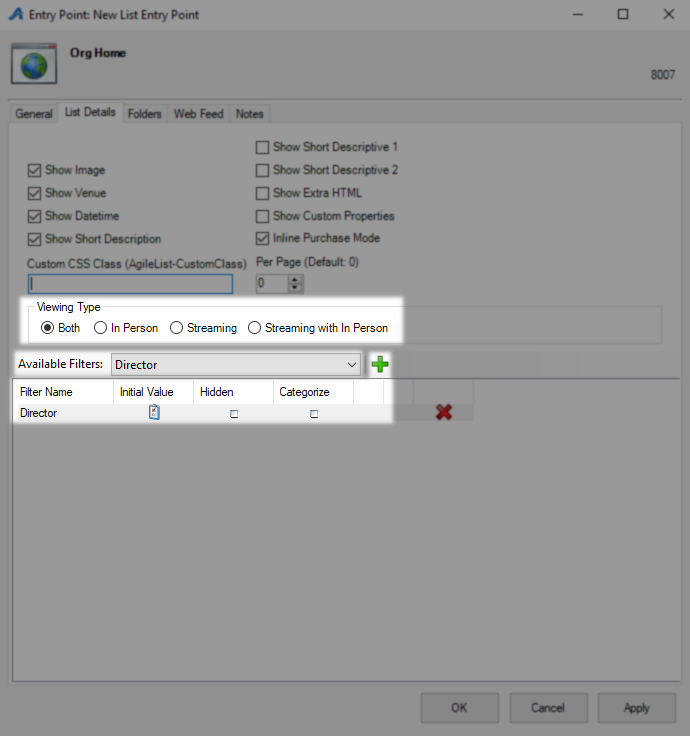
On the List Details tab, you can select what to display and how for the items you have included in this entry point. All of the boxes such as Show Image will display information pulled from the event or item info fields of the same name. Not all fields are available on all entry point types.

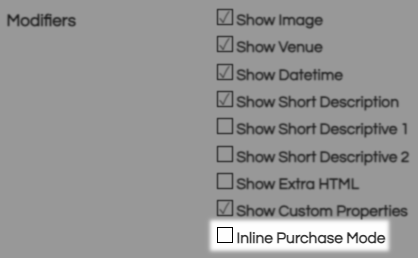
Inline Purchase Mode keeps the customer on the info page when they click to buy tickets and instead loads those tickets on the page they are on.
The Per Page field works only with the Category List display type and when in that mode it is advised to set this at a high number to ensure your pages load full of your programming. A value of 100 would make a great starting point for testing out this setting.
Viewing Type is a way to have only in-person or streaming content showing on this list, the default which will display all of your items is Both. The Available Filters section is used to create filters for your customers. Using the drop-down menu select the item you would like to filter by and click the green plus to make it an active filter. In the active filters area, you can click Hidden to make this a background filter customers don't even see and use the Categorize check box with the Category display type. Clicking the Initial Value icon will allow you to set the default for this filter.
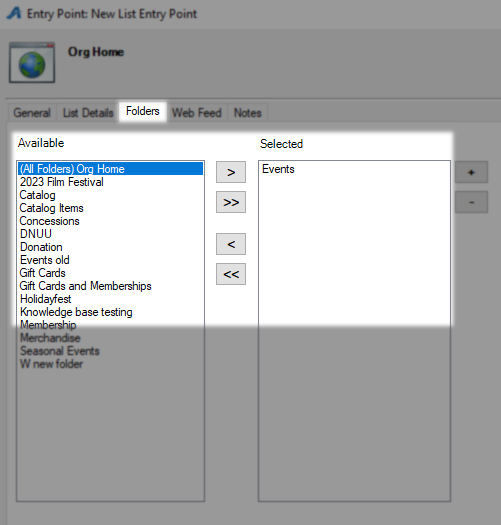
The Folders tab is how you designate which folders the system will pull items from. You must select something on this tab or the list will load blank but can designate all folders to include every item regardless of folder including folders you may build in the future. Move your selection from Available to Selected using the arrows between the two fields.
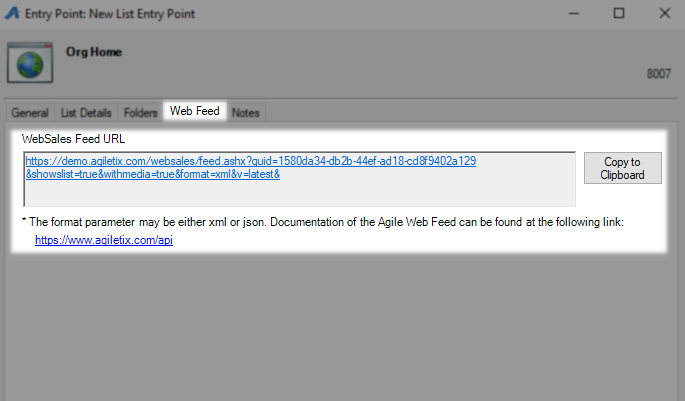
The Web Feed tab is where you will find the link you need to set up an RSS/XML feed and also has a link to our API documentation. This link will not generate until you have clicked Apply or OK to save this entry point.
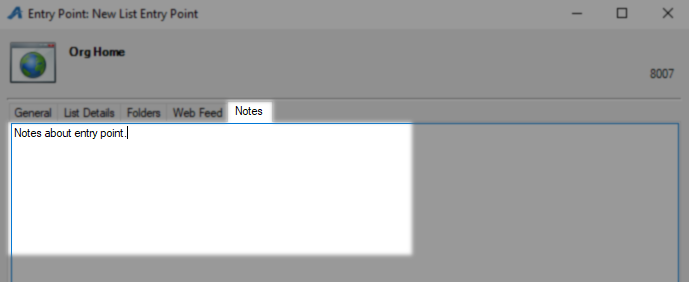
The Notes tab is just a place to leave information about what the entry point does or why it was created. Nothing here is customer-facing.
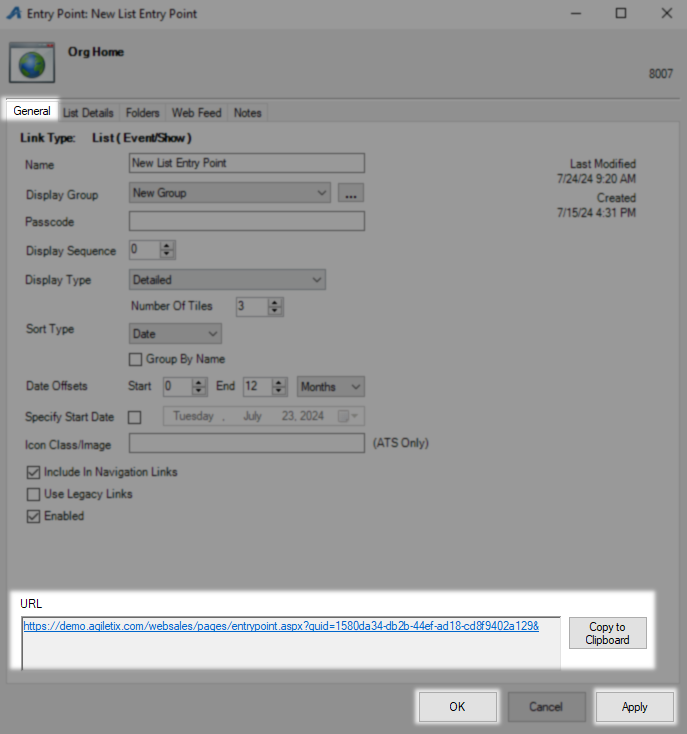
Click Apply and swap to the General tab to get the link you created from the URL area. Clicking OK will save and close this entry point.
While this is being built out please visit our legacy knowledgebase at This Link.